Can you tell me some tips about top coat and Qan[T] because my next gunpla is MG Qan[T] and the full saber. And this is going to be my first time top coating and also I live in Australia which is extremely cold.
Hello again! Top coating Gunpla is a must to protect all paints, decals, weathering you've done. Also takes out the toy-ish feel if you use Flat/Matte topcoat.
Tip is, NOT to use topcoat during high humidity condition. excess humidity will cause topcoats to "frost", leaving your Gunpla covered with snow. Find a dry sunny day. (a test spray on runners will help telling you if the weather condition is ok, Frost will occur after 10 minutes)
As for MG Qan[T], the shield bits connector are very tight. avoid topcoating them as they will tighten even more, and will snap your connector when you play around the sword forms. (notice I never change my sword into big riffle mode, I don't even wanna try taking them off the connector)
This kit will have weight issue, topcoating / painting the joints will add some friction. like what I did. My MG Qan[T] have no weight issues.
Full saber's GN connector is not well designed. they won't have articulation like the original. it will limit your shoulder/ arm articulation, and scratch my shoulder armor's topcoat. which is why I never used it.
Sorry for being a pest but, when I panel line my gundams the line is thick and when I see other people's panel lines on their gunpla it is thinner than what I have.
did you use a cotton bud to rub the excess ink off? that could help making your panel lines appear finner.
or are the panel lines thinner than your panel lining pen ? in this case you could try using the real touch markers. These markers' ink works like washes. they reach finner panel lines compare to panel lining pen.
The second question was the right answer, sorry for not putting enough detail with my problem. Does the real touch markers make smudges when you rub it off? Also, is it thinner than a panel lining gundam marker(which is the tool I use for panel lining)?
well.. the rub off effect of the real touch markers give a "shading" effect like what airbrush can do (pre-shading) real touch can mimic that effect pretty well!
rub it gently in circular motion with the cotton bud will create soft smudge around the panel line. while still keeping the panel lines dark.
well, the real touch markers are soft tip. feels like tiny brush. the ink is very water-ish. so the ink can reach deep / thin panel lines compare to normal panel lining tip.
So does top coat make another layer and by putting a lot of layers on joint it will cause the to part to stay there right?(Also how would you know that you used enough topcoat on a joint?)
Yup, Topcoat makes another layer on it. well, I've just put 2 layers of topcoats on my kit (including joints) that makes it though enough to hold all weight issues. try it on! and see if you solved your weight problem. if not, one more coat focus on the joint.
Another way to tighten joints are using Wood glue. I think that works too. I'm just too lazy to glue them and since I need to topcoat it, might as well topcoat the joints to solve the problems
How did you hide the nubs for the greyish parts for the 00 raiser because I have a MG seven sword which is a 00 raiser except no raiser and has 8 swords(which is confusing, because the name states "7" sword even the sword is not in plural, really confusing :( )
For nubs removal, I used a decent nipper with shape cut, cost me a little more but its worth it as it won't give stress marks to the plastic. (blunt nipper will tear the nub and cause stress marks even sanding off won't remove it)
then I'd sand it.
finally, if you somehow leave a stress mark, use a Real touch marker of the similar colour. apply it and rub it with a cotton bud. as you can see, Real touch markers are used widely! that's why I always promote Real Touch Markers. =D
well, Gundam Markers works well too if you manage to use the exact right colour (like the 00 series markers) but I tend to use Real Touch markers as you don't need to buy every series' colour variation. =/
e.g. red appears to be dark in Real touch markers. but it blends when you rub it.
Nice explanation, had to use my Japanese dictionary(my dad) to translate. So does that mean buying that real touch marker blender is useless? Also back to the topcoat, if I mask the clear part and I sprayed top coat on it will it affect the clear part? Thanks as always. Also which state do you live in?
Well, actually the blender is used mostly in weathering. It's a whole new level for the real touch markers. I explored a little on this kit. But I'll go further in my RG strike trinity project! So stay tuned!
Nope masking clear parts will protect them from the topcoat. You'll be fine with the results.
Would you recommend this method for applying water decals? http://www.facebook.com/photo.php?fbid=10150979773871897&set=a.10150979773836897.448317.382602901896&type=1&theater
oh yes, totally. This is the method I'm using. But, I will apply Mr Mark Setter on the plastic surface before step C. and MR Mark Softer after step G.
Adding these two steps will help the decals adhere on bare plastic surfaces better. waterslides MUST be used on gloss surface/ bare plastics. if you are painting the kit with gloss paints, then Mr Mark setter is not necessary.
Note: never use waterslides on flat/ matte surfaces.
yay, I'm finally going to buy the MG Qan [T] tomorrow and after reading the manual for the full saber so many times I still can't determine if the the full saber has the sliding handle gimmick. Can you help me out.
What did you do to make it hold the full saber like that?? I had lots of trouble with it and I thought there is no way for me to make it hold unless I know how to modify.


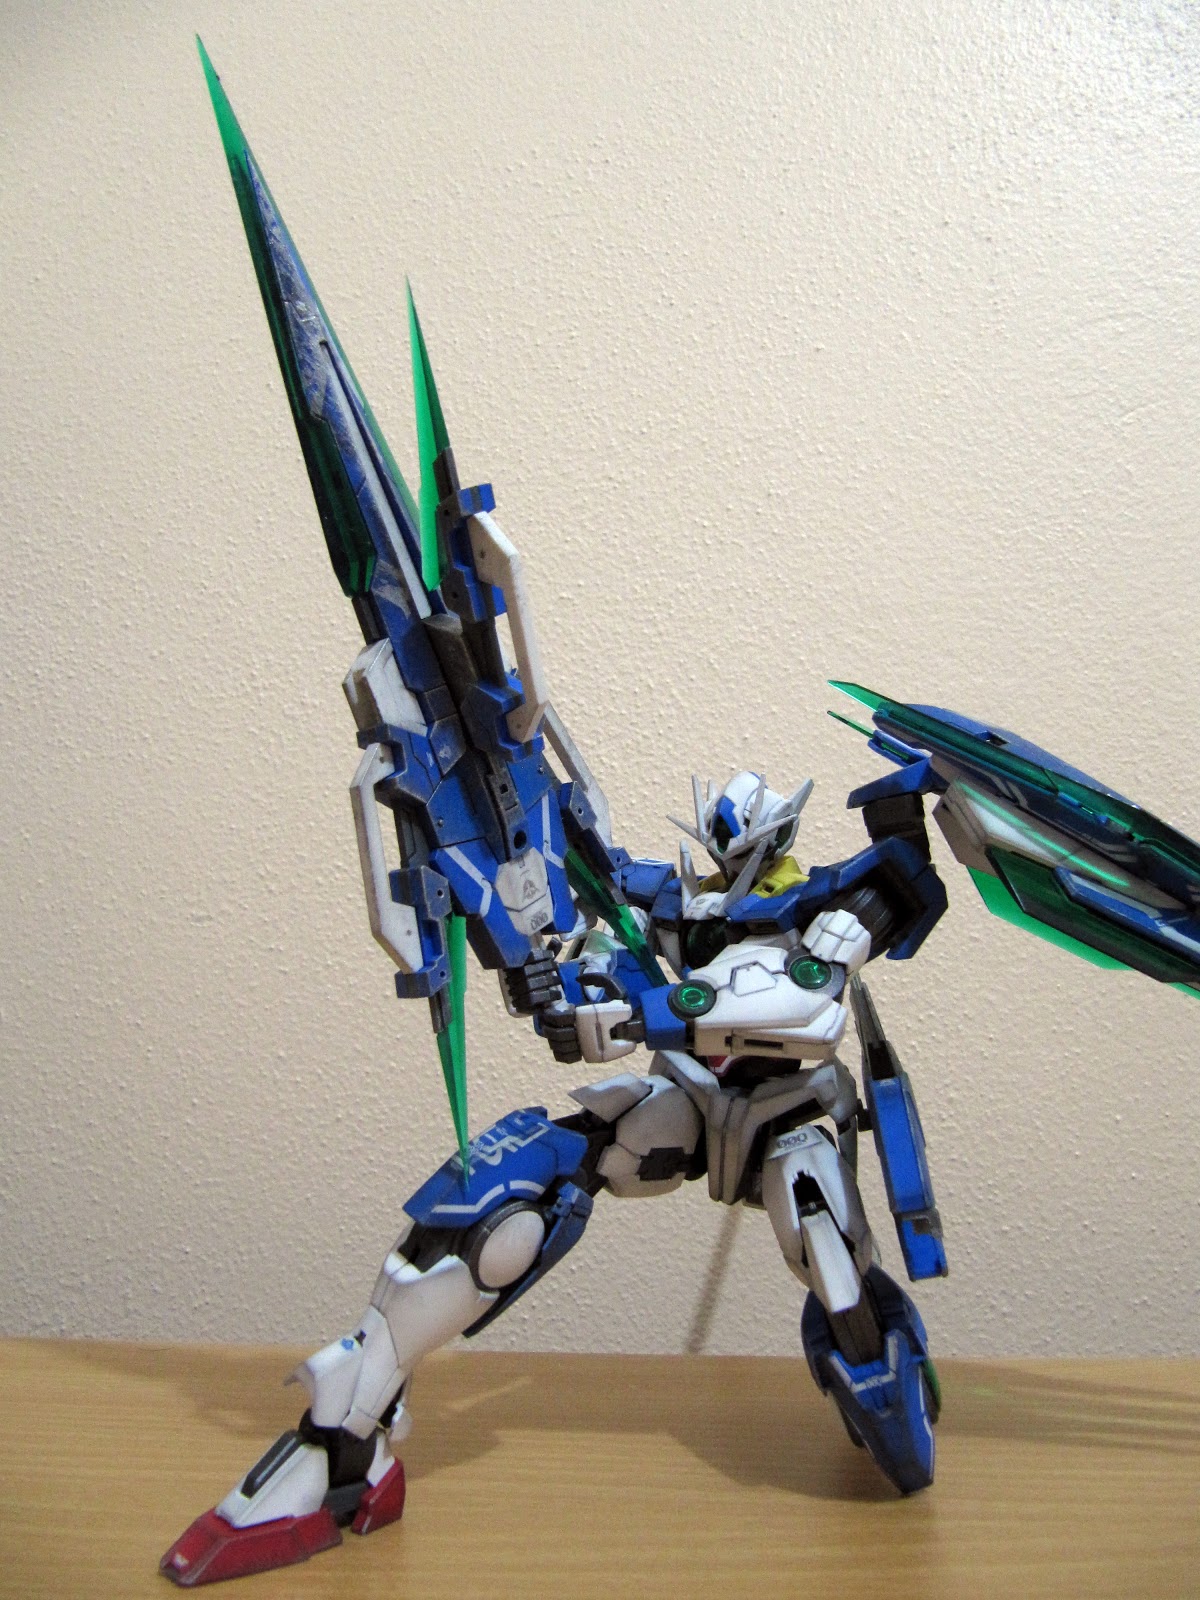


nice posing, anyway, I would like to know how much is heavy the GN sword IV?
ReplyDeletehmmm~ I don't know exactly how heavy it is.. but it weights similar as the left shield + bits of the Qan[T].
DeleteI see!! thanks for the info!
Deleteyou're welcome... =D
Deletethat is some extreme weathering, good job.
ReplyDeleteThanks for the commend! =D yea, it is some weathering.
DeleteHow do you keep the heavy GN Sword IV in its hands? I'm having trouble with that
ReplyDeletewell, there are some tricks on holding that sword. Paint the joints, and support the sword with the wrist guard. =D
DeleteCan you tell me some tips about top coat and Qan[T] because my next gunpla is MG Qan[T] and the full saber. And this is going to be my first time top coating and also I live in Australia which is extremely cold.
ReplyDeleteHello again! Top coating Gunpla is a must to protect all paints, decals, weathering you've done. Also takes out the toy-ish feel if you use Flat/Matte topcoat.
DeleteTip is, NOT to use topcoat during high humidity condition. excess humidity will cause topcoats to "frost", leaving your Gunpla covered with snow. Find a dry sunny day. (a test spray on runners will help telling you if the weather condition is ok, Frost will occur after 10 minutes)
As for MG Qan[T], the shield bits connector are very tight. avoid topcoating them as they will tighten even more, and will snap your connector when you play around the sword forms. (notice I never change my sword into big riffle mode, I don't even wanna try taking them off the connector)
This kit will have weight issue, topcoating / painting the joints will add some friction. like what I did. My MG Qan[T] have no weight issues.
Full saber's GN connector is not well designed. they won't have articulation like the original. it will limit your shoulder/ arm articulation, and scratch my shoulder armor's topcoat. which is why I never used it.
other than that, ENOJY! Its a wonderful kit!
P/s: I will make a new "Review" section in my blog to review all the kits I've done. Stay tuned.
DeleteSorry for being a pest but, when I panel line my gundams the line is thick and when I see other people's panel lines on their gunpla it is thinner than what I have.
DeleteIts ok, feel free to ask and learn together.
Deletedid you use a cotton bud to rub the excess ink off? that could help making your panel lines appear finner.
or are the panel lines thinner than your panel lining pen ? in this case you could try using the real touch markers. These markers' ink works like washes. they reach finner panel lines compare to panel lining pen.
The second question was the right answer, sorry for not putting enough detail with my problem. Does the real touch markers make smudges when you rub it off? Also, is it thinner than a panel lining gundam marker(which is the tool I use for panel lining)?
ReplyDeletewell.. the rub off effect of the real touch markers give a "shading" effect like what airbrush can do (pre-shading) real touch can mimic that effect pretty well!
Deleterub it gently in circular motion with the cotton bud will create soft smudge around the panel line. while still keeping the panel lines dark.
well, the real touch markers are soft tip. feels like tiny brush. the ink is very water-ish. so the ink can reach deep / thin panel lines compare to normal panel lining tip.
head on to this WIP 1.5 of my PG astray.
DeleteThese real touch markers can do lots of things. not just panel lining. they can make your plastic turn out REAL.
http://gundambeginner.blogspot.com.au/2012/06/pg-astray-red-frame-wip15.html
So does top coat make another layer and by putting a lot of layers on joint it will cause the to part to stay there right?(Also how would you know that you used enough topcoat on a joint?)
ReplyDeleteYup, Topcoat makes another layer on it. well, I've just put 2 layers of topcoats on my kit (including joints) that makes it though enough to hold all weight issues. try it on! and see if you solved your weight problem. if not, one more coat focus on the joint.
DeleteAnother way to tighten joints are using Wood glue. I think that works too. I'm just too lazy to glue them and since I need to topcoat it, might as well topcoat the joints to solve the problems
Deletelight coats of top coat right? Also how did you avoid using top coat on some parts? (Also I like this blog because you respond quickly).
Deleteyup.. 1 or 2 coats will do.
Deletedid you mean clear parts? I always leave the clear parts out until final assembly. that way topcoat wont get them.
Thanks for the support! I always keep this blog active =D
How did you hide the nubs for the greyish parts for the 00 raiser because I have a MG seven sword which is a 00 raiser except no raiser and has 8 swords(which is confusing, because the name states "7" sword even the sword is not in plural, really confusing :( )
ReplyDeleteFor nubs removal, I used a decent nipper with shape cut, cost me a little more but its worth it as it won't give stress marks to the plastic. (blunt nipper will tear the nub and cause stress marks even sanding off won't remove it)
Deletethen I'd sand it.
finally, if you somehow leave a stress mark, use a Real touch marker of the similar colour. apply it and rub it with a cotton bud. as you can see, Real touch markers are used widely! that's why I always promote Real Touch Markers. =D
Sometimes the stress marks are too deep that real touch markers can't get rid of it. In this case, I'll spray paint it. =/
DeleteDamn it, I spent $25 for gundam markers and now they have been beaten by real touch markers. Anyway, thanks for the tip.
Deletewell, Gundam Markers works well too if you manage to use the exact right colour (like the 00 series markers) but I tend to use Real Touch markers as you don't need to buy every series' colour variation. =/
Deletee.g. red appears to be dark in Real touch markers. but it blends when you rub it.
I'll find you a link that explains it.
Deletehttp://4.bp.blogspot.com/-xMs6BBN7UgQ/T9JqtcpszXI/AAAAAAACp38/MYbeRtN7Ghw/s1600/2ii.jpg
Deletehere you go. this is the link for a MG Marasai build. first 2 rows are the use of Real touch markers for nub removal and panel lining.
Nice explanation, had to use my Japanese dictionary(my dad) to translate. So does that mean buying that real touch marker blender is useless? Also back to the topcoat, if I mask the clear part and I sprayed top coat on it will it affect the clear part? Thanks as always. Also which state do you live in?
DeleteWell, actually the blender is used mostly in weathering. It's a whole new level for the real touch markers. I explored a little on this kit. But I'll go further in my RG strike trinity project! So stay tuned!
DeleteNope masking clear parts will protect them from the topcoat. You'll be fine with the results.
Me? Im from tasmania.
Wow you are from Tasmania, sad it is separated from the main land whilst I live in Melbourne. Thanks for replying
Deleteyea, I'm from the lonely island. =/
DeleteWould you recommend this method for applying water decals?
Deletehttp://www.facebook.com/photo.php?fbid=10150979773871897&set=a.10150979773836897.448317.382602901896&type=1&theater
oh yes, totally. This is the method I'm using. But, I will apply Mr Mark Setter on the plastic surface before step C. and MR Mark Softer after step G.
DeleteAdding these two steps will help the decals adhere on bare plastic surfaces better.
waterslides MUST be used on gloss surface/ bare plastics. if you are painting the kit with gloss paints, then Mr Mark setter is not necessary.
Note: never use waterslides on flat/ matte surfaces.
wow man can wait to buy this thing , I think for another month
ReplyDeletehey, same I'll only be able to get this till next month.
ReplyDeletehmm? are you guys buying from HLJ too? [July Restock]. LOL!
ReplyDeleteyay, I'm finally going to buy the MG Qan [T] tomorrow and after reading the manual for the full saber so many times I still can't determine if the the full saber has the sliding handle gimmick. Can you help me out.
ReplyDeleteCongrates! yea it has a sliding gimmick, which can be really tight. just make sure you sand it down a bit if you are planning to paint.
DeleteWhat did you do to make it hold the full saber like that?? I had lots of trouble with it and I thought there is no way for me to make it hold unless I know how to modify.
ReplyDeleteHey there, I managed to get the sword to rest on the army's armour.
DeleteYeah, I have the problem too, but if you try the method out, you'll know the trick